Author Archives: Raizen

Coach Red Pill Might Have Actually Died In Ukrainian Prison This Time

It happened again. There’s another news story going around about how Gonzalo Lira died in Ukraine. Gonzalo Lira went by his pen name, Coach Red Pill. Remember him?

This story was brought to us by The New Voice of Ukraine via Yahoo News. As you read through the story, you’ll probably get an idea of just how things are going for journalism in Ukraine. Anyone who has ever voiced any amount of skepticism about the war in Ukraine is made out to be pro-Russian.

In a previous post, I pointed out that Gonzalo was jailed and possibly killed in Ukraine after The Daily Beast’s Mark Hay wrote a hit piece on Gonzalo, calling him pro-Putin. At the time, Gonzalo was staying in a country where if a journalist accused someone of being pro-Putin, that’s something that can stick.

I could ask Mark Hay how he feels about this development, but the fact is, when you libel someone, it’s your desire to destroy them. You know how guitarists like those decals that read, “This machine kills fascists”? Perhaps Mark Hay would want one for his keyboard, which reads, “This device kills bloggers”.

While I’m not familiar with Gonzalo’s career, I know that when he went by the handle Coach Red Pill he was outspoken about the state of world affairs, and advocated running off to another country for safety. This was some time before the Ukraine war popped off, and the country that Gonzalo chose to run to for safety just so happened to be Ukraine.

In hindsight, that wasn’t a great choice.

There is an expression that goes like this: truth is the first casualty of war. As I see it, the truth exists independent of anyone’s acceptance of it, and survives any attempt to destroy it. There are far too many journalists who are trying to do just that. And now, a blogger who was in the wrong country at the wrong time has become another casualty in a war between one bad guy and another.

I could hardly focus.

Forgoing a decent attempt at an intro, here’s the madness:

Honestly, I struggled to keep focus. When someone starts spouting metaphysical pseudo-spiritual psycho-babble in the same way that Chris Chan has been lately, I have a hard time staying engaged. At that point, I just assume that they don’t have anything of value to say, and my mind drifts to something I’d rather be doing. Such as playing a video game, or modifying a recipe, or even something as normally dull as watching some soap opera that my mom liked, which goes to show how long the list of things I’d rather be doing can get when I’m stretching what politeness that I have to wait for them to just finish talking so I can say, “Hey, that was something. Thanks for sharing that. Bye.”

At some point, I caught that she didn’t quite understand how to explain the gender she felt like, which sounds like she’s under-qualified to do as much as exercise simple metacognition. Because of this, I wonder whether she was really successfully stringing her sentences together, or my mind was somehow filling in the blanks in a hallucinatory manner, similar to how holes in a wall can disappear when they are covered by a blind spot.

Now, here I am pondering whether this wonder of a person can so much as operate a microwave unsupervised, or whether this task is delegated to a handler in an institution. In either case, it’s clear that she’s not wanting for something to eat.

What I did get out of the video is that some woman out there doesn’t know how to explain a gender that’s a product of her own imagination, but she’s so cocksure that she’ll assert that she still knows it better than you.

Whatever drugs she’s taking to make her happy, they seem to be working a treat.

Johnny Somali Fined 200,000 Yen

According to Yahoo News Japan, nuisance streamer Johnny Somali has just been sentenced to a 200,000 yen fine by a Japanese court for obstruction of the operation of a business, which if you know Japanese culture, you know that that’s something that they take very seriously.

If the name Johnny Somali rings a bell, odds are, you’ve heard of the infamous Kick streamer whose routine is going to one of the most polite places in the entire world and acting like a jackass. Japan is basically what you’d get if LinkedIn was its own country.

Johnny Somali (Ismael Ramsey Khalid) was in Japan as a student, but gained infamy with his streams on Kick, which often depict him acting disruptive in public. Among his antics included trespassing on a construction site (for which he was charged, but the charge was dropped), playing loud music in public, getting into disputes with locals, loudly playing adult-rated anime on a train, taunting locals by saying “Hiroshima” and “Nagasaki”, among other antics.

Johnny Somali was largely considered a nuisance, and the Japanese seem to be happy that a court was willing to make an example out of him.

As of this posting, 200,000 yen amounts to approximately $1373.40. Which is probably a fraction of what he made with his Kick account.

I know I’m not the only one for whom a visit to Japan would be a boyhood dream. But I know what to expect while there. If you’re going to go to Japan, it’s expected of you to conform. If you don’t want to conform in an advanced and heavily-educated industrial society, then Japan isn’t the place for you.

Don’t believe me? Just last year, two people in Japan were arrested over a prank that involved double-dipping with used chopsticks into a communal container of pickled ginger.

There’s speculation on social media that Johnny Somali could be deported from Japan. But for the time being, it’s still only that: speculation. At this point, Johnny Somali has only been fined for his actions. I know that people want to see the Japanese throw the book at him. After all, his antics are infuriating. But at this point, that still hasn’t happened.

But considering the narcissism that we’ve seen out of Johnny Somali up until now, coupled with his tendency to act out on a whim, it’s likely just a matter of time.

Jews in NYC Riot Over Tunnel

This morning, I opened up X, saw a story about Jewish tunnels in New York City, and thought, “Oh boy, now what is it?”.

Apparently, a tunnel was discovered connecting a Synagogue in NYC to a grate across the street. Since its discovery, the city proceeded to attempt to fill the tunnel up, sparking a riot among the Chabad Jews who carved the tunnel, apparently because they really liked their tunnel.

There’s a bit of misinformation going around about how the tunnel might have been built so that Jews could access their Synagogue during the Covid lockdowns, but if we’re being honest, it’s still not completely clear what purpose the tunnel served. As one might expect, the intellectual dead-ends who blame the Jews for every last problem that they have were quick to assume the worst, because of course they would.

I’ll be honest and say that I’m no expert when it comes to Judaism, but from what little I know, among the Jews, the Chabads are considered to be something of an outlier, similar to how the Mormons are viewed by the rest of Christianity. I really don’t know what kind of religious justification there could be for a tunnel going from a synagogue.

But whatever the reason may be, a bunch of people in black suits and funny hats flew into a rage at the prospect of the city of New York filling the tunnel back up.

If you wanna see, and I don’t blame you, I managed to find someone on social media that hosted a video that had an impartial tone:

Also, I’ll share this because I found the picture cute. Mozel tov mouseys!

There’s also some disinformation about this story going around. Which is to be expected, because there is potential to defame the Jews, and there’s an excess of sub-room-temp-IQ wignats who defied the rules of natural selection to survive to the point that wireless internet can be set up for them, with the rest of us probably paying for it in some way. Dispelling disinformation is not my job, and if it was, it’d be a full time job, and probably wouldn’t pay enough considering the muck one would have to sift through. Among these is the claim that the tunnel led to an elementary school across the street, and was used to expedite a child-trafficking ring.

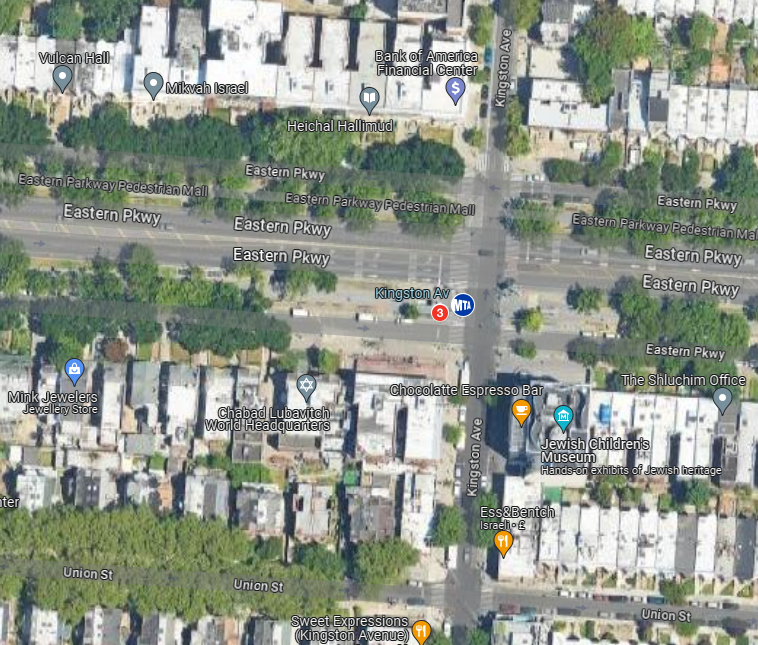
So, I entered “Chabad Lubavitch World Headquarters” on Google Maps to check to see whether an elementary school was, in fact, across the street from the Synagogue. This is what I found:

All one really had to do was check Google Maps and see for themselves that there’s no elementary school across the street from the Synagogue in question. If you fell for the lie, then the world must be a scary and confusing place for you. Which it is for the rest of us, but perhaps much more so for you.

As for what the tunnel was really about, I suppose we’ll find out from much brighter people in the days ahead. But considering the sheer number of Jewish facilities in the area, I suspect that they wanted an access tunnel, and went ahead and carved one out without the city’s permission. Which is irresponsible, considering the danger of sinkholes and the possibility of a tunnel collapse. I know that crossing the street can be quite an inconvenience in a place like New York City, but carving a tunnel is quite the investment of time, itself.

If you can think of a conspiracy theory involving Jewish tunnels that actually sounds intelligent, please share in the comments. I’m still yet to hear one.

Why Biden Takes the Jan 6 Riot So Seriously

It’s now been over three years since the riot that took place at the U.S. Capitol building on Jan 6, 2021. Since then, the left has taken to memorializing the event as a threat to democracy, and Biden himself has incessantly referenced it, including in his latest campaign ad.

No wonder Trump was such an effective real estate mogul, what with his ability to live rent-free in people’s heads.

It’s obvious that to the Biden administration the Capitol riot was no ordinary riot, even if all evidence points to it not being the deliberate insurrection that the left has made it out to be, but instead a demonstration that escalated to a level that was not originally intended.

What is it about the Jan 6 Capitol riot that gets under Biden’s skin? What follows is speculation about what might be happening with Biden’s thinking.

When a person would become President of the United States, they undergo a slight change in their thinking. They’ll begin comparing themselves to previous presidents.

While it’s true that there have been protests against the policy positions of previous American presidents, the Capitol riot was the first of its kind, in that people showed up in the thousands to resist the very certification of a man who supposedly had the support of the majority. While it’s true that the protesters don’t represent everybody, they acted on the frustrations of a significant portion of the electorate who believed that they weren’t being represented.

Again, this type of protest was unprecedented in its kind, and grand in scale. What’s more, it was a direct challenge to the Biden administration.

It seems as though a vast majority of people who would run for public office has at least a slight amount of narcissism. Seeing as though Biden has held office for roughly five decades, there’s higher potential for narcissism. In the eyes of a narcissist, they must be loved by most reasonable people, and anyone who would not love them must be unreasonable. This may be playing into how Biden has been coping with the Capitol riot: by making Democracy itself out to be in danger, and making himself out to be a hero, fighting the good fight. In this narcissistic fantasy, the people who don’t accept him must be acting out of malice or ignorance.

After all, to know a narcissist is to love one.

However, an American president doesn’t just compare himself to other American presidents, he compares himself to other world leaders, particularly other influential leaders like those who lead countries such as China, Russia, India, Japan, Germany, and the U.K., just to name a few examples. And, as it so happens, it’s rare for leaders of those countries to see such strong opposition to their leadership, particularly on a day as significant as the certification (or respective ceremony) of their particular appointments.

When you understand this, you understand why Joe Biden and his administration are as insecure as they are.

And, as a further blow to his pride, the candidate that serves as the spiritual representative of the frustrations against the Biden administration is the current frontrunner of the opposing political party, and it’s not even close. And this has occurred in spite of every petty legal obstruction that’s been waged against him, and every attempt to make him out to be an enemy of democracy.

In fact, if the upcoming election were to be held tomorrow, it’s likely that Donald Trump would win. If this were to happen, Joe Biden’s pride would be dealt the cruelest stroke. This would mean that the public, after hearing everything that he had to say about his opponent and his constituency, still sided against Biden. At that point, what would he have left?

While this was speculation, I think it’s reasonable to consider when pondering just what it is about the Jan 6 Capitol riot that Joe Biden seems to take so personally. I’m a bit concerned, because as history has shown us abundantly, when men of power are insecure, they tend to turn to desperate methods.

Personally, I think that this election year is going to be interesting. It’s obvious that there’s a whole lot of pride at stake. I’ve said before that in order for democracy to work, each side needs to see their opposition as legitimate. Both major factions have room to develop as far as that goes, and it doesn’t help that there are people all over who wouldn’t make that easy.

While people ascribe huge significance to the presidency, as I see it, his power should be limited to the point that it shouldn’t make much difference who he is. People should care more about local government, as that can make a far bigger impact on their lives. What’s more, other representatives are significant, considering that if one political party does not control all branches of government, they can’t just push through whatever they want.

Here’s hoping that cooler heads prevail, but to be honest, it’s hard to tell which ones those would be.

Goofball Finds Support For Israel In Fast Food Wrapper

You’re not ready for this. You’re about to laugh the hardest you have laughed in a long time.

You sitting down? Here we go:

As much as I’d like to believe that this was all some act, I know that people like this actually exist. When you’ve had a job in which you have to interact with the public, you see many different kinds.

But this is truly special. Here’s the kind of person who listens to a televangelist, and thinks that the sermon had some kind of special, hidden message that was intended specifically for them. The kind of person who makes financial decisions based on horoscopes, and names their kids after the first name they hear after turning on the radio, because fuck any chance they could have at living normal.

“Wow. What does that resemble?” Could it be the McDonald’s logo? A helpful reminder of where you just spent your money? The icon to blame for making you fat?

The moment you heard the woman say, “This is in support of Israel.”, you couldn’t see the guy’s face, but you could hear it drop. I know that wage slaves are under enormous pressure to maintain a veneer of professionalism, but I can’t imagine any manager out there would fault him for saying, “Are you serious?”

But you heard her tone, she was as totes cereal as a sack of processed grains at the supermarket.

What are the odds that two basic colors used on fast food packaging could coincidentally resemble the colors of Israel’s flag? So low that, according to the people who put watermelons in their X posts because the colors are similar to the colors of the Palestinian flag, it couldn’t be a coincidence, and must necessarily indicate support for the state of Israel.

I get the fact that stupid people believe in synchronicities to help them cope with the fact that they’re going to die someday, and that there is nothing special about them, but it’s time to keep it real: belief in synchronicities can destroy your mind. And the above video has shown us a great example.

Dude No Longer Has Free Wi-Fi, Complains To Neighbor

Sometimes, a guy with a screw loose will come right up to you, and surprise you with what they say. This is one of those times.

A man visited his neighbor complaining that he put a password on his wi-fi, so he can no longer use it for free. And the exchange was caught on video:

I can say first of all that, depending on where you live, it may be illegal to access your neighbors wi-fi without their permission, even if it’s not password-protected.

Second, while it’s great that the man learned well enough to put a password on his wi-fi, he’s probably got some double-digit IQ datasec practices if it took him two years to figure out that that it’s a good idea, and only arrived at that determination after hearing advice. Wi-fi has been widespread for about two decades, and its best practices have been pretty well-established. I can imagine that he’s still yet to use a VPN or ad-blocking software.

Now, let’s get to the heart of the issue at hand. A man has been using another man’s wi-fi for free, without permission. And he’s been doing it for so long and justifying it with his own flawed reasoning that when he suddenly had to do without, he feels slighted.

So, what does he do? He goes up to his neighbor and complains about it, and two worlds collide.

I can only imagine what the guy has been doing with his neighbor’s wi-fi that caused it to slow down to the point that it’s become noticeable. Perhaps he’s been downloading the latest Final Fantasy games in a handful of European languages, not because he has any intention of actually playing them, but because if he’s going to do something so illegal, he may as well go for the gusto.

Of course, we can appreciate just how goofy a guy is that he doesn’t seem to understand how wi-fi works. He knows well enough how to hook up to an unsecured network, but seems to think it’s location based, as though one device on a network can’t tax bandwidth if it’s used outside of one’s personal property. I get the idea that the guy may have had some help connecting.

While the guy suggests a couple solutions to his new lack of access to wi-fi, I have a better one: stop being so cheap and get your own ISP.

Made In Abyss: Binary Star Falling Into Darkness Walkthrough Part 7: Black Whistle

Back to Walkthrough Menu

Back to Part 6: Moon Whistle (Part 2)

Now that you’re a Black Whistle, a lot more options open up. For one thing, you can now fast travel up to the 5th layer. What’s more, you can now fast travel from the 3rd and 4th Layers, too. It also costs less Health and Fullness to fast travel.

Now that you can fast travel from layer 4, you can also complete the Nanachi quests more quickly. What’s more, by fishing Hamashirama in the 5th Layer, you’ll no longer be stuck on the one requiring Hamashirama Meat. While you’re at it, you can take a quick trip to the Hidden Hot Spring to take some more relics up with you as you fast travel back up. The relics that Nanachi gives as rewards are usually those that you can find on the 5th layer. You’ll want to hold on to some, as you’ll need at least 5 of each, for a reason we’ll get into later.

Eventually, you’ll reach Nanachi’s Quest 10, in which Nanachi requests 3 Horizontal Layer Board, 5 Vertical Layer Board, and 5 Fox Bone. If you’ve been stocking up on relics, this shouldn’t be much problem. The reward for this one is Nanachi’s Helmet. There seems to be an oversight which allows you to go through the quests again and eventually get another Nanachi’s Helmet. So, unless this gets patched, you can get two.

I understand that a lot of fans are going to want to wear Nanachi’s Helmet on principle. For its weight, it offers some decent defense, and has three equip slots. However, it doesn’t have a light, and takes a lot of time and effort to get to. Personally, I prefer Hablog’s Hat at this point, but if you’ve gotten Nanachi’s Helmet, you’ve earned the right to wear it.

You have more options with your skill points. As usual, you can increase the weight capacity of your backpack so you can take more of that sweet loot back with you at a time. But I highly recommend Skinner, because that will double what you get from fallen primeval creatures, including what you fish up. This is huge.

Armor upgrades from 4-Star Items include the Bone set and the EX Warm set, and Relic Synthesis (Mid Class) grants High level relic weapons that will make some bosses much easier, and a new High relic armor set.

Guild HQ has more quests. Accept them all. Even if you don’t complete them, there’s nothing to lose in accepting them.

The Supply Shop has two new sets of armor: the Feather set and the Agile set. There’s also new weapons. The Caravan Fleet has a new set of armor as well, the EX Warm set. There are a couple new charms.

As for which armor I recommend, I’d say go for the Feather set. You don’t get to upgrade it until you get to White Whistle, but when you get there, you’ll be able to upgrade it to an armor set with an excellent combination of defensive ability to weight. Ambitious players may go for the Relic (High) set, but they’re an upgrade of an upgrade, which is a lot of trouble to go to for something that’ll just become obsolete when you reach the final rank.

Or, if you’re thinking ahead and you’re sure you want the best Relic armor when it becomes available, you could instead go for the Agile set. Once you reach White Whistle, the set can be upgraded again to the Agile (Black) set, then upgraded again to the Relic (Special) set. What you go for depends on whether you prefer high defense or more room in your bag.

But the most noteworthy of the Caravan items is the Type 4 Energy Rations, the best food item in the game. They’re light, and restore lots of Health, Fullness, and Energy. The main drawback is that they’re expensive, but it becomes easier to stock up on them with time.

At Laffi’s Shop, there’s a quest that has Hablog’s Hat as a reward. It’s actually not a bad hat, so if you already have the Feather or Agile hat, you might want to chest it until White Whistle, when you can upgrade them. You’re also rewarded with the Hamashirama Pot recipe, which Nanachi loves, and is not a bad recipe to go with until you have an easier time swinging Type 4 Energy Rations.

Laffi also starts selling Zutsugi Root, which you had no problem gathering, anyway. Yay.

Now, onward to adventure!

Near the entrance of the 4th Layer, in the Goblets of Giants, a sidequest opens up which initiates if you draw close to the purple exclamation point. There is a strong boss here, so if you’re not ready for it, you can avoid it by walking along the edge of the platform its on.

OPTIONAL BOSS: Orb Piercer
This battle works basically like any other Orb Piercer, in that it has only one attack, with a ridiculously distant area of effect. The emergency dodge is the only thing that seems effective to avoid it, but not always. Perhaps you have to dodge in a certain direction, like backwards. It does a lot of damage, and causes a special poison condition that does a lot of damage at a time. If you strike its face, you cause a moment of recoil. If you follow it up with one more well-timed strike, you might deny it an opportunity to attack, which is kind of cheesy, but still requires some timing.

The prize for winning is a Thousand-Men Wedge, but you’re expected to return it to Guild HQ, and when you bring it there, you lose it. But if you have it equipped to a piece of armor when you go to the Guild HQ, they won’t take it, but the quest will still count as completed, anyway. This Thousand-Men Wedge stacks with the one you get from Ozen, so if you have both equipped, you do HUGE damage with even weak weapons, but your Fullness drops much faster. So, don’t leave them equipped if you don’t plan on fighting for a while.

At some point, Jiruo will ask to go with you to Ozen at Seeker Camp. With fast travelling, this becomes trivial.

To initiate your Main quest, just climb down into the 5th Layer’s Sea of Corpses 1 to initiate a cutscene. Then your new Main quest becomes Head to Ido Front.

You’ll probably like the 5th Layer. The relics here are really valuable, the creatures here, while dangerous, are easy to avoid, and the map layout is easy to comprehend. What’s more, the Swarm Shockers (Blue) that spawn in when you spend a lot of time in one area aren’t aggressive, so you can take your time fishing if that’s what you’re up for.

There are certain spots in areas like Sandy Ice Area 1 which are large, round, and flat, and might start to crack with a little walking on them. If this happens, get off of them. If they break, Stingerheads will emerge, and if you’re right on the center when it breaks, it’s an immediate Expedition Failed.

In the northeast part of Hail Jail, near the pond, there is an optional boss that has a random chance of spawning with each dive.

OPTIONAL BOSS: Interference Device #5
There’s really not much to this boss. If you’re using the strongest Relic gun, you might defeat it pretty quickly, especially if you’re at a high level. This boss has a chance of respawning with each dive, which is great considering its potential rewards. Upon defeat, it will reward you with random relics. Most of them are relics that you could obtain from the other layers, but you have a small chance of obtaining more Thousand-Men Wedges this way. There is also a small chance of obtaining a Star Compass, which isn’t that great, but it’s the only way to obtain Star Compass in this game, which might matter to you if you’re a completionist. To save scum for the relic you want, first determine whether this boss appears on the current dive. If so, restart from an auto save, then use a mail balloon right before initiating this battle, for convenience.

Ido Front can be accessed by going from Sea of Corpses 1 to Sea of Corpses 2 to Eternal Garden to Hail Jail to Sandy Ice Area 1 to Ido Front. There, you can enter Ido Front Internal.

This is it; it’s time to confront the Sovereign of Dawn, Bondrewd the Novel. If you remember everything you’ve heard about him, you might think that Bondrewd is some kind of monster. As it turns out, he’s worse than you might have thought: He has a fetch quest for you.

Five each of Maze Twine, Double-Bell Ball, and Spiraling Heat Stone. If you’ve been doing the Nanachi quests, you’ll have a slight head-start. Each of these are relics that you can find in the 5th Layer. If you’re down to the last two and are getting frustrated looking for the last ones, you can resume from an autosave if a sparkling red ore near an autosave didn’t give a relic you wanted.

Once you have all the relics you need, you need to bring them all to Bondrewd in Ido Front Internal. They’re heavy, so you’ll want room for them. You’ll also want to be combat ready, because a fight begins once you return to Bondrewd, relics in hand.

BOSS: Bondrewd the Novel
If you have at least one Thousand Man Pin equipped, this battle will probably be too easy, and you could probably just finish it up by running up to Bondrewd and swinging away until he stops doing mean stuff. Otherwise, you’re going to want to have relic weapons and plenty of healing items. If you hate quicktime events, you’re going to want to finish him quickly, because one of Bondrewd’s attacks, Gangway, can hit you anywhere you’re standing, and can only be avoided by quicktime event. His melee attack is a swing from his tail, which has a decent range. He also has a ranged attack, Far Caress, which begins as a dark sphere surrounding your character, which then shrinks around them. You can avoid this with Emergency Dodge. Once you’ve done enough damage, a quicktime event initiates in which you must mash a button. Fail it, and the battle continues with Bondrewd gaining a little more HP. Otherwise, you’ve won.

Once Bondrewd is defeated, you’re rewarded with two items: Prushka’s Hat and a replica of Bondrewd’s whistle. The hat is probably lighter and provides less defense than what you might be wearing, and doesn’t have a light. It’s more of a trophy item than a practical equip. As for the whistle, it increases arm and leg injury resistance when equipped to a piece of armor. Not bad.

But it’s not over yet, because there’s one more battle. It’s up to you to prepare or face the final boss, head on. If you’re ready, proceed from Ido Front Internal to The Altar.

FINAL BOSS: Tiare
Tiare is your size, and he’ll run about, trying to draw close with his hatchet. He uses a combo attack similar to the way you can if you’ve been spending Skill points on your weapon. He can also unleash a burst of energy that radiates in all directions, with little warning. The plus side to this is that after the attack is complete, you get a huge opportunity to attack. Like with Bondrewd, once you’ve whittled his health down, a quicktime event initiates in which you have to mash a button. If you fail it, the battle resumes, with Tiare regaining a little bit of health. If you succeed, the battle is over, and you’ve won.

After the battle ends, you’ll obtain a Life-Reverberating Stone, but you’ll need to approach the pod to gain the benefits associated with becoming a White Whistle. Doing so will make the credits roll.

Once the credits roll, you’ll get to save the game, and can resume from this Clear Data on the surface as a White Whistle. You’ll also have a replica of Lyza’s White Whistle in your inventory. This can be equipped to a piece of armor to increase your critical hit rate.

Congratulations on becoming a White Whistle!

For those who might become adventurers, there is a choice: Death, or unfulfilled longing. Which one is more dreadful? For those who are adventurers, the choice is already made. What awaits those for whom even death is not a deterrent? That is decided by the adventurers.

To Part 8: White Whistle

Made In Abyss: Binary Star Falling Into Darkness Walkthrough Part 6: Moon Whistle (Part 2)

Back to Walkthrough Menu

Back to Part 5: Moon Whistle (Part 1)

Making it to the 4th layer, you’ll still be a Moon Whistle, so shop inventory doesn’t seem to change, and you’ll have access to the same skill trees as before. You’ll be able to fast travel into the 4th layer, but you still won’t be able to fast travel out of the 3rd Layer, so when you begin your dive into the 4th Layer, be prepared for the return trip through the third. Also, just diving into the 4th Layer takes a lot out of you, so you’ll probably want to bring plenty of eggs just to offset the cost of the trip.

A Hunting Party side quest becomes available, and it’s pretty simple, as it only requires going to the 1st Layer. It’s a quick battle that ends with a simple quick-time event. Also, if you found the missing Moon Whistle that Marulk asked you to find in the 3rd Layer, and treated his injury, you can take his letter to Marulk and complete this quest. If not, don’t worry about it. You can beat the game without taking on this quest, anyhow.

Like most layers in this game, the 4th has an apex predator that you might be better off avoiding, if you can. In the 4th, that would be the Orb Piercer. This nasty critter has tons of health, and has a nasty attack that’s fast and has a long area of effect that can hit, even from a seemingly-safe distance. What’s more, they also inflict a special poison condition that takes away more HP at a time than red poison, and can only be healed with a special kind of antidote or by returning to the surface. Usually, avoiding these is not a problem, but there is a possible Orb Piercer spawn location on a route in a 4th layer questline, so it’s not a bad idea to bring along some extra Mail Balloons and trying to find an opportunity to sneak around it.

Before journeying into the 4th Layer, it’s recommended to bring plenty of Ropes, because shortly into it, you’ll initiate a questline which will require lots of ropes just to get around. You can find Rhombus Thorn Plants that can help offset the use of Ropes, however.

If you have any questions as to whether the events in this game are canon, this questline should answer them. As you enter the 4th Layer, you’ll encounter Riko, who wants a certain herb, and won’t allow you near her until you have it. It’s nearby in the Goblets of Giants. Bring it to her, and she’ll join you as you both search for Reg. This can last a while, and involves some fighting, so be sure you come prepared with lots of food and weapons.

Just for bringing the Spring Bringer herb to Riko, you’ll be gifted with Old Cave Raider Hat. It’s like Marulk’s hat, but with a bit more defense, but Marulk’s hat still provides more light.

The layout of the Goblets of Giants seems to sometimes change on subsequent visits, so don’t be surprised if you sometimes see a different layout.

That aside, you’ll find Dechuanga’s guide along the way, in the Giant Vine bridge. This concludes the 4th Layer Investigation, so continue with Riko. Hopefully, the game didn’t decide to spawn an Orb Piercer along the way. If so, use a Mail Balloon to make a place to resume from in case things go wrong as you try to get around it.

The journey takes you to Eternal Fortunes. Here, you’ll have a battle against a Kudara. After that, Riko will task you with finding 2 Hard Meat and 2 Eternal Fortunes. The Hard Meat is a drop from the Kudaras that are nearby. After you’re done, it’s back to the Goblets of Giants. The questline concludes with 2 battles against groups of Horncriers (Subspecies), which puts some wear on your weapons. But your prize for all this is the Scaled Umbrella, which doesn’t have much attack, but high durability. As far as I know, it’s the only one you get.

After your playdate with Riko, you’ll be near the entrance to the Goblets of Giants, so go ahead and make an autosave for yourself by using the entrance, if you want, just in case something goes wrong.

It’s possible to meet Nanachi in this game. The method is so obscure that many players aren’t even aware that meeting Nanachi is possible. To do it, you need to have no one in tow, so finish up the Riko questline. Then, you need to take a fall that normally does lethal damage. Taking a fall from anywhere where you’d normally use a rope may suffice, as there’d have to be a solid surface below.

Once the cutscene is over, you’ll have access to Nanachi’s Hideout, which can be accessed near the entrance to Goblets of Giants. There are many perks to having access to this place. Nanachi has quests which involves seeking out various items or ingredients, or Nanachi will request a prepared meal. You can give Nanachi just about any prepared meal, and the better the meal, the better Nanachi’s response. The reward for the meal is a high-grade relic, so give Nanachi the best you have to offer. Among the best items are Laffi’s Special Lunch and Hamashirama Hot Pot. Eventually, Nanachi will request Hamashirama Meat, which can only be obtained in the 5th Layer, so if you want to complete them all, they’ll have to go on the back burner.

From Nanachi’s Hideout, you can access Hidden Hot spring, where you can get some easy relics. You can also access Crystal Valley from here, so you’ll have a quick route through the 4th Layer.

Back on the surface, if you visit Guild HQ, you’ll find that Habolg has recommended you for Black Whistle. But there’s a condition: Go to a location in Deep Tree Remains by yourself and make it back alive. By now, you should know what that means: It’s another boss battle! You’re going to want to bring a lot of food for the trip there and the trip back. You’ll also want to be well armed. If you save two Relic Pickaxes for the battle, that’ll be plenty.

To get to the boss, fast travel to 4th Layer, then go from Goblets of Giants to Nanachi’s Hideout to Hidden Hot Spring to Crystal Valley to Giant Vine Bridge to Eternal Fortunes to Deep Tree Remains, where the boss can be found. This might sound like a long trip, but you’ll only be in most of these areas briefly. Head to the Main Quest marker on the map to initiate the battle. No prize for guessing the boss’s identity.

BOSS: Interference Device #4
As with the other ones, no need to scan it, this boss will be automatically added to your notebook. This guy is easy. He’s got a wave-motion cannon that he can sweep side-to-side, so be sure you’re not in front of him when he fires it off. He lets off a burst of flame right before firing it, so you only have a brief window to get some melee attacks in. But that’s it, that’s all the boss can do. His attacks do a lot of damage, but they’re predictable.

Once you defeat this boss, poke your head in the 5th Layer so you’ll have a fast travel point later on. Then, it’s time for a return trip. Returning through the 4th Layer the way you came is pretty easy. As for the 3rd Layer, here’s the video again for if you don’t already have the path memorized:
https://www.youtube.com/watch?v=5NUDVFpGvIg

The trip back is kind of long, but think of it as a victory lap. Enjoy your new Black Whistle!

To Part 7: Black Whistle

Made In Abyss: Binary Star Falling Into Darkness Walkthrough Part 5: Moon Whistle (Part 1)

Back to Walkthrough Menu

Back to Part 4: Blue Whistle

As a Moon Whistle, you can now fast travel to the 3rd Layer. What’s more, it now uses less HP and fullness to fast travel. And if you so much as poke your head into the 4th Layer, you’ll be able to fast travel there, too. This part of the guide focuses mainly on your adventures as a Moon Whistle in the 3rd Layer. You won’t be able to fast travel out of the 3rd or 4th Layers until you are a Black Whistle, and that’s still a way’s off.

For one thing, you have another batch of quests at the Guild HQ which encompass the 3rd and 4th layers. Accept them all.

The supply shop carries a lot of new items, but are mainly either lighter or somehow more effective. You can actually get a lot of mileage out of the weaker weapons, but you might want to bring one or two different varieties of stronger weapons to switch between for stronger enemies. There’s also new armor sets: the Mesh set and the Bone set.

Laffi’s shop sells more indredients and items, the best of the new options probably being Adult Onigiri, as it’s light and gives more energy, which is great if you run low on energy while climbing. Other than that, you’re still well off relying heavily on Boiled Eggs and Crumbled Boiled Eggs. But make something unusual if it appeals to you, as you do have plenty of options available.

The Caravan Fleet has begun stocking the Warm armor set, as well as Special level charms. If scanning primordial creatures is your thing, a Telescope is now available, which can scan from longer distances, and can zoom.

Now for the Skill trees. Under Cave Raid, spring for Gatherer first. It’s more awesome than the description implies. You’ll get double what you forage from plants and other miscellaneous pickups. You’ll get enough to craft a rope from one Rhombus Thorn Plant, and each Broken Mail Balloon you find will give you enough materials to craft a Mail Balloon. You’ll also get to enhance the ability to wall climb, to the point that the walls in the earlier layers will become nearly trivial. Really, all skills in the Cave Raid tab are must-haves.

Under Craft, the 3-Star Items allows for upgrades to the Mesh set, while Relic Synthesis (Low Class) allows for crafting relic weapons, which are heavy and hit hard. Maybe you’ll want one, which can help big against powerful enemies such as Foreign Cave Raiders, in the event that they ambush you. It also allows you to craft Relic armor. Again, I don’t bother much with crafting ammo because you can just buy it and that seems like less trouble.

For Battle, prioritize upgrading Dodge and whatever weapons you prefer. If your melee weapon of choice is the pickax, focus on that, and if your range weapon of choice is the Bow, focus on that.

For recommended armor, I’d say go with the Mesh set and its upgrades, aside from Marulk’s Hat if you prefer it for its illumination. The Warm set upgrades are heavier, but provide not much more defense. Relic armor looks impressive, but doesn’t provide much defense relative to its weight and the resources that go into them, which include relics and the already-upgraded Cook set. Considering that it’ll become obsolete once you hit Black Whistle, the Relic armor set probably isn’t worth the trouble, and you’ll probably find yourself preferring the weight allotment of the Mesh set for longer dives.

Now be warned: The 3rd layer can be confusing for those who don’t know it well. And making matters worse is that there are many vertical locations, so the map isn’t going to help much in some cases. But it helps to have a route memorized, and if you can find that route, getting back to the second layer (and thus the surface) becomes much easier.

s gwilly on YouTube has an unlisted video in which he demonstrates a route from the room where you battle the Boss to the second layer, which requires 1 Rope to complete. Here is the URL to the video:
https://www.youtube.com/watch?v=5NUDVFpGvIg

If you can memorize that path, you’re going to be in great shape. And don’t worry, the 4th Layer is going to be much easier.

There is a quest that can be activated at Seeker Camp in which you search out herbs with Marulk. Because you can fast travel to the 3rd layer, you can easily access Seeker Camp from Heaven’s Waterfall by simply turning around at the entrance to the 3rd Layer. As part of this quest, you’ll have to fight an Ottobas. Run away to avoid its charge, and be cautious about attacking from the side, as it can get on its side and roll. It’s not much trouble if you have a Relic Pickax, and defeating it takes a quicktime event. It doesn’t provide much time window, so pay attention. This is a great opportunity to complete the quest from the guild to defeat an Ottobas. Once Marulk’s quest is cleared, Marulk will give you another optional quest concerning finding a cave raider lost in the 3rd Layer. There isn’t much need to worry about it.

But if you’re up for something to worry about, you’ll get an optional boss battle if you were to go to Ozen’s Room and talk to her.

OPTIONAL BOSS: Ozen the Immovable
You can make any number of attempts at this boss until you win, and if you lose, it’s not a Game Over. But don’t get the idea that this battle is easy, as the typical player won’t be ready for this, even with the optimal gear available at this point.

Ozen can speed towards you, then grab you with her arm. If this connects, she’ll throw you straight up, high enough to inflict the strains of ascending. You’ll take damage upon contact with the floor, and lose stomach contents. Sometimes, the strains don’t kick in. I’m not sure what affects this, but may have to do with the fact that this battle takes place on a slope, and running about on it might increase susceptibility to the strains when thrown. Ozen can also lift boulders, and what she does with them determines how she attacks. She can just throw the boulder, which is easy to avoid. But if she crushes it in her palm, she’ll fire a conical spray of debris, which can be avoided with an emergency dodge.

At this point, Ozen’s damage output is too high, and yours is too low. It’s probably a better idea to come back to this after you become a Black Whistle. But the rewards for completing this battle are great. For one thing, you get Ozen’s Umbrella, the best hat in the game, even if it’s a little heavy and doesn’t have a light. You also get a Thousand-Men Wedge, an item that pushes your Attack stat into the sky when equipped, making even your weakest weapons catastrophic. It may even make the rest of the game too easy. You also get a replica of Ozen’s whistle, which increases HP when equipped.

Whether you go for this battle now or later is your call, but you’re probably better off putting it off.

There are a few optional quests that start appearing at this point. One involves a boy in the classroom who lost his father’s keepsake, another is from Jiruo, concerning a relic in the second layer, and Laffi has a quest for delivering a letter to Seeker Camp. None of these concern going deep into Hell’s Crossing, so they should be simple enough.

Anyhow, this is about the time in which you may start running into Foreign Cave Raiders. They’re enemies that appear in groups, and have access to weapons such as pickaxes and guns. There are spawn points where they may randomly appear, but they won’t appear unless you’ve triggered them. Whether they appear at a spot is determined randomly each time you enter the Abyss. When defeated, they tend to leave some nice drops, such as sophisticated weapons and prepared meals. But if you’d rather not deal with them, then try to memorize where you bump into them, and try avoiding those spots.

When you get the quest for High Temp Ecology Study, it helps to know that there’s actually an alternative entrance to the 3rd Layer that leads directly to the Cold Heat Layer. When fast traveling to the 3rd Layer, go back through the entrance to Heaven’s Waterfall. If you climb down into the fault, you’ll find an entrance to another location on the 2nd Layer called Updraft Wasteland. You can access the 3rd Layer’s Cold Heat Layer from there. As dangerous as the place looks, avoiding the lava spouts is no problem, just keep an eye out for the boulders. It’ll take a couple ropes to get you to the quest point, but by this time, you should have a stock of about ten ropes in your standard kit without being told to bring them. At this point, their weight and the funds needed to buy them are becoming increasingly trivial, so be in the habit of having plenty on you and replenishing them between dives.

Once you enter the small room, you’ll be unable to leave until you defeat 6 Mountain Spinner (Ice). If you didn’t bring enough weapons to complete the task, you’ll be stuck. A Relic Pickax is recommended, here.

The 3rd Layer introduces a new vexation that thankfully only appears in The Great Fault, Trapped Pirate Ship, Quadruple Pit, and Rock Slide Hall, and only outside: the Madokajacks. These things make climbing in these areas a nightmare, unless one doesn’t spawn near you. Because of these, you don’t want to waste time climbing. They are hard to avoid, thanks to the fact that they have hit boxes that are too big for their frames. They do a lot of damage, and if you’re climbing, you’ll probably take lethal damage from the fall. You can try killing them, but they have a lot of health, and you’ll pretty much need ranged weapons. So, for the most part, you’re better off avoiding them unless there’s some trick to them that hasn’t been figured out.

Anyhow, onto the first Main quest of the 3rd Layer: Investigate the Third Layer. First, head to Quadruple Pit. You can reach here if you continue on from your High Temp Ecology Study quest. Just continue from the Cold Heat Layer to Glass Layer. Near the bottom of the room, you can climb to a narrow corridor that’s blocked by ice that’s destroyed by simply sounding your whistle. Remember the boy who lost his father’s keepsake? You’ve found it. Just avoid the Crimson Splitjaw and climb up to a room with an ice block in the middle. Sounding the whistle again will start a small cutscene that will reveal the way to Quadruple Pit. Just inside, you’ll find Detchuanga (indicated by the yellow whistle on your map). Continue the video above from 8:30 if you want to return to the surface from here. The journey is short, but complicated enough that a visual guide helps more than an explanation.

The next point point of interest for Third Layer Investigation is in Trapped Pirate Ship. Reaching it is mostly simple. Fast travel to third layer, but turn around back to the 2nd Layer. Remember how you could then go down from Heaven’s Waterfall to the Updraft Wasteland? There’s another entrance to the 3rd Layer if you keep going down from the entrance to Updraft Wasteland. This leads to The Great Fault. Oh the left, along the wall, you’ll find some caves. The furthest one over leads to Trapped Pirate Ship. Make a rope, and go down into the cave below to initiate a cutscene with a couple familiar characters.

The Main quest Third Layer Investigation and High Temp Ecology Study converge in the Freezing Hot Mines, which is accessed via Rock Slide Hall. To get there, you’ll need to climb down lots of walls where Madokajacks may appear. It takes some exploring the internals of Rock Slide hall, but you’ll be on the right track when you follow a long tunnel down.

Shortly after entering the Freezing Hot Mines, you’ll be unable to escape until you defeat 1 Mountain-spinner (Fire) and 3 Rock-lickers. After that, your ecology research and the request from Jiruo will be complete!

Your Third Layer investigation concludes with a boss battle, which initiates when you access the yellow whistle on the map.

BOSS: Interference Device #3
This one is airborne, and will fly about. It will occasionally stop, and make pillars of lava appear, which are indicated by red circles as warning. You can damage this boss by jumping and swinging your weapon, but sometimes you’ll be able to hit it from the ground without jumping, despite the appearance of distance. This one isn’t too hard, but don’t get hit, as the lava inflicts red poison. Red poison drains HP. As with the previous Interference Devices, it will be automatically added to your Notebook.

As your reward, you’ll gain access to the 4th layer, and your Main quest becomes Fourth Layer Investigation. Hooray for progress!

If you do enter the 4th Layer and travel a short distance, you’ll initiate a quest line that you’ll be unable to end until it’s completed, so unless you’re willing to commit to it right away, just poke your head in to make a fast travel point, then follow the route in the video above to quickly return to the surface.

To Part 6: Moon Whistle (Part 2)